Wireless Debugging Android in Unity using ADB
Have you ever been wasting time trying to find your USB cable to build and debug the Unity app on your android device? Or maybe your USB port is already full? Or maybe your PC doesn't recognize your phone (my case)? Well fear no more, because we will now learn how to debug Unity android build just using wireless.
I've been debugging android devices with USB before because it was the simplest method to debug your app for problems. Because usually, the output from Unity Editor and its build can be quite different. For example, in one of my projects, I noticed that the script kept crashing This of course require me to test it on the device directly and try to see any problem. However, since I changed my PC, I noticed that it could not detect my android since it keeps saying USB is not recognized. I already tried it on another PC and it works, so I guess it was just my PC. Sadly, I already tried reinstalling the driver but it doesn't show any progress. So, I was thinking, can I just debug it wirelessly? Well, a quick google search shows me this result :

Which is of course kind of not easy to follow for beginners. Also googling, "How to debug Unity wirelessly" didn't show me any easy-to-follow guides. However, from the source above we know that it is indeed possible to perform debugging wirelessly using ADB (Android Debug Bridge).
How to setup android wireless debugging with Unity
Before we start please keep in mind the requirements below :
First, you need to locate where is your ADB software. If you install Unity with the Android SDK module it can be easily found in the preference window under the External Tools menu. Edit > Preferences > External Tool.

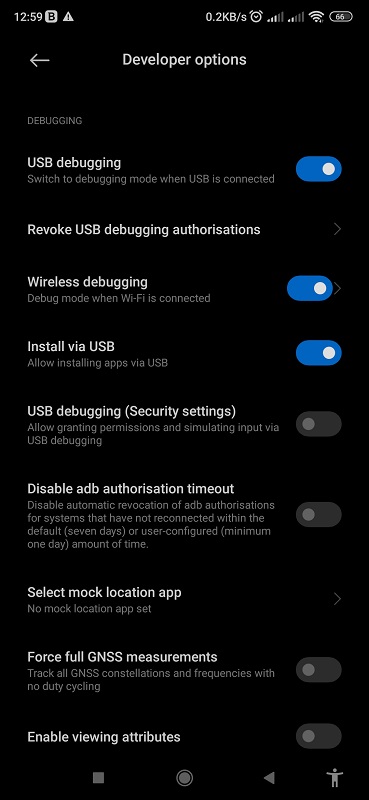
After that, you can try to go to your android SDK location and find the folder named platform-tools . In this folder, you should see a file named adb.exe. From this open your terminal (use PowerShell if you use Windows) and open the containing folder first by copying the current directory and run cd on the terminal. In my case, it is cd C:\Program Files\Unity\Hub\Editor\2022.2.1f1\Editor\Data\PlaybackEngines\AndroidPlayer\SDK\platform-tools. Before we start pairing, we need to enable wifi debugging first in our android phone. To do this, just navigate Developer Option and enable Wireless Debugging. This is usually near the USB Debugging option. Below is the example pictures :
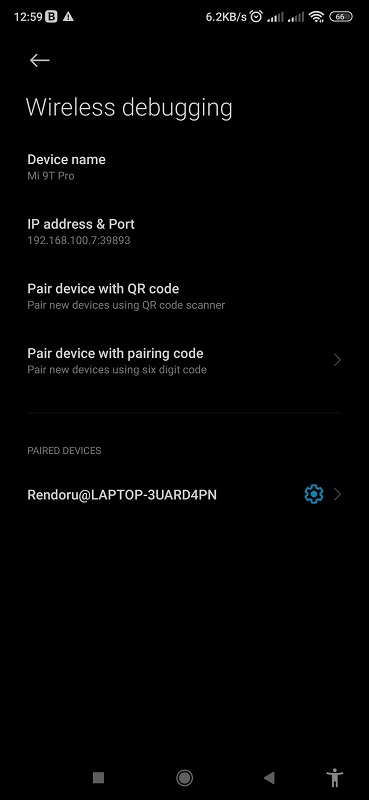
As you can see above there are some actions that we can do, but we are mainly interested in the paired device with the pairing code since we can't do the QR code ones with unity. Now click on the pairing code and it should show you the code that you might need to use later. Now get back to the terminal that you just opened later and use the adb pair {{IP-ADDRESS}}:{{PORT}}, replace it with the IP address and the port that is shown on your android. For example, mine should be like this below adb pair 192.168.100.7:43455 :


After doing that you should see the paired device like in the screenshot below. You can just connect to your ADB by entering the command adb connect {{IP-ADDRESS}}:{{PORT}}. However, you have to use the IP Address and port as shown on your android device. Below are examples of mine adb connect 192.168.100.7:39893 :

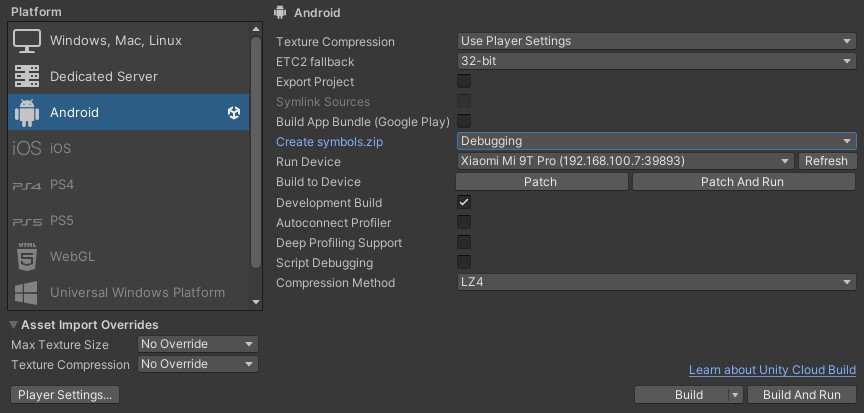
If you successfully connected to the ADB server, then it should show your devices if you run adb devices like in the screenshot above. Now if you get back to unity it should now show your device in the build editor.
And that's all I think, hopefully this will help you debug on your android devices. Happy debugging!